Index
Postprocessing Pipeline
The goal of the pipeline was to make an API that is really easy to use for the users, and that requieres as little graphics knowledge as possible. The result, is as simple as the following:
ref_ptr<Composer> cam_composer = Engine::ref().scene()->camera()->composer();

cam_composer->set_shadow_mapping_enabled(true);
cam_composer->addPostprocessSSAO()->addPostprocessBloom()->addPostprocessFXAA();
This API makes some assumptions:
The user will not create new postprocessing effects, they will just be able to compose the scene and tweak each render passes parameters.
Some postprocessing effects will just simply not be compatible together, but no one will stop the user from trying to set them up together, and you will just see one of the two in action.
The results will not be the most incredible performance-wise, due to redundant calls and prepasses just to be able to treat each postprocess atomically and simplify the lecture.
However, the composer class could of course be overriden to create a faster and more optimized composer that really makes use of its passes and reuses them, but this would need to be made by the developer.
But the user does have some degree of control when it comes to sort of composing their own passes. Each addPass() call receives two optional parameters, an input texture, and a pointer to an output texture. This way, the user could compose a complex pass like this example, composing god rays:
ref_ptr<Texture> blurred_tex;
blurred_tex.alloc();

cam_composer->addPassGaussianBlur(4, NULL, &blurred_tex);
cam_composer->addPassNegativeFilter(NULL, NULL);
cam_composer->addPassBlend(NULL, blurred_tex, NULL);
By passing NULL (or just nothing) to the input and output parameters, the composer identifies that the postprocess should use as input the output of the last performed render pass. When overriding the input parameter, the new texture is used as input. When passing a texture object to the output field, the user obtains the output of that render pass on that texture (as done in the Gaussian Blur pass). This can be later used to pass it as an input parameter for another pass. In this case, Blend pass receives two input textures, so by sending the previous output texture we have effectively performed a blend between two previous passes. This example may seem kind of lame, but it has been core to being able to easily implement more complex postprocessing effects such as SSAO or God Rays.
Postprocessing Effects
SSAO
Screen Space Ambient Occlusion consists in darkening the surface of an object, based on how occluded it is by the surrounding geometry or, to put it in another words, how accessible the light is to a specific point. Ambient occlusion hugely improves the visual quality of a scene at a relatively low cost.
Same image with (left) and without (right) the ambient occlusion:
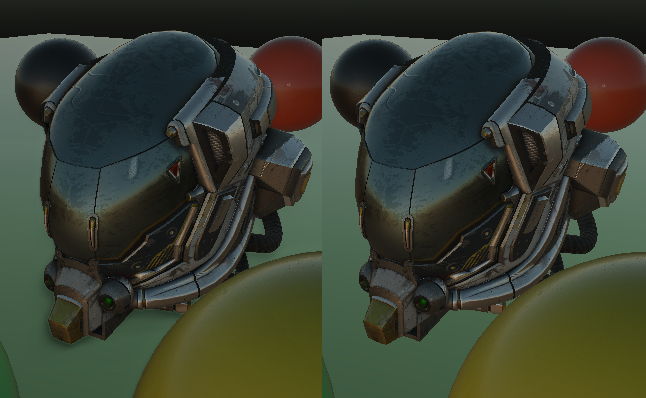
Having trouble to see the difference? It is hard to see the effect if you are not familiar with its results. Look at the edges of the helmet and you will see a dark contour that gives it a sense of depth (it is specially visible behind the helmet!)
Implementation
This implementation is based on the John Chapman's normal oriented hemisphere method. It consists in sampling points on an hemisphere oriented along the surface normal of a pixel in order to check the depths of the surroundings and calculating the occlusion based on this factors.
1. The SSAO step requires the position and normals in viewspace in advance, in order to sample depths of the surrounding pixels, so a pre-pass is performed in advance1.
1: This step could be avoided by reconstructing positions from depth!
2. The next pass is where the magic happens. Apart from this two textures we will need to create a sample kernel of vectors which will serve as the points in the hemisphere. In order to make it more accurate, after the points are calculated they use an accelerating interpolation function to make them closer to the center of the hemisphere. In order to randomly rotate the sample kernel a small random texture is also passed as input to the shader.
Once in the shader we iterate through each sample vector accumulating the occlusion value, and translate it from tangent-space to view-space by using a tangent-bitangent-normal matrix. Then we need to take a sample of the depth and compare it against the sample depth; in this step, we perform a range check in order to make sure that we are not counting as occlusion a too far away of the actual object. We achieve this by zeroing any contribution from outside the hemisphere radius. Apart from the range check, we add a bias parameter to the comparison in order to avoid acne-like artifacts.
All that is left now is to average the resulting value by dividing by the kernel size. As extras, we have a strength factor that multiplies the effect, and a mist/fog effect that is applied based on camera distance in order to avoid showing occlusion in far areas.
3. At this point, we are gonna want to blur the result to remove most of the artifacts caused by the noise pattern.
4. Finally, all that remains is to merge the blurred SSAO texture with the scene texture. For better results, I decided to use the luminance coeffiecient to apply the occlusion.
vec3 kLum = vec3(0.299, 0.587, 0.114);
float lum = dot(color.rgb, kLum);
float lumInfluence = 0.5;

vec3 output = vec3(color * mix(vec3(ssao), vec3(1.0), vec3(lum) * lumInfluence));
Bloom
Bloom or Glow refers to the effect of extending the borders of the brightest areas of the screen, creating the illusion of an extremely bright and overwhelming light to the camera or eye.
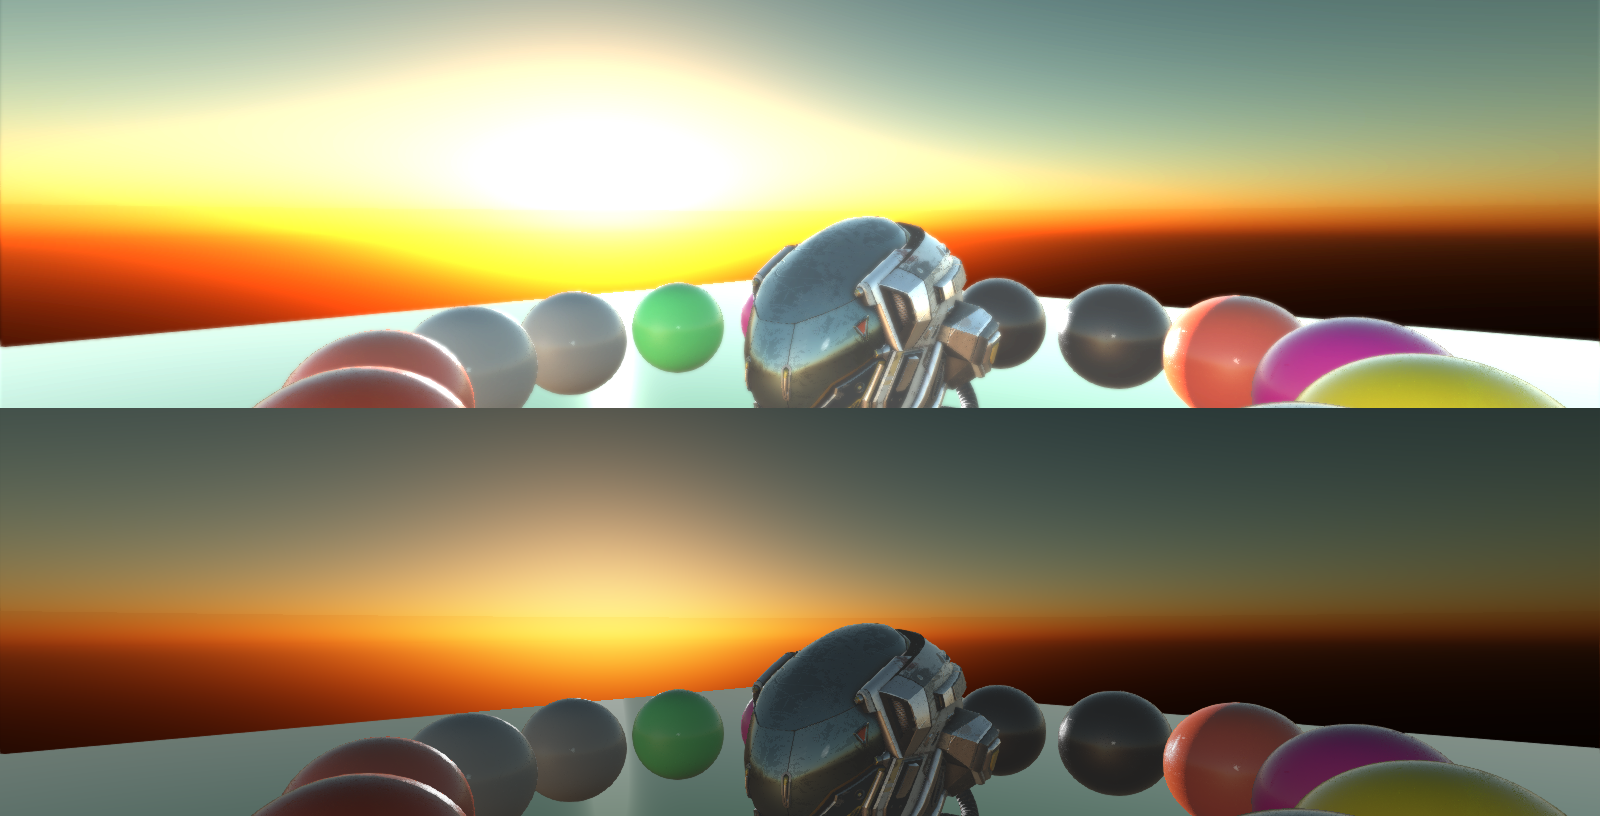
Same image with (left) and without (right) the bloom effect:
Implementation
This implementation is based of this effect is rather simple.
1. A first pass defines a color brightness threshold, above which the color is normally rendered to the framebuffer, and below which the color is rendered in black.
2. After this, the resulting texture is taken and a Gaussian Blur is performed on top of it in order to create the overwhelming effect.
3. Lastly, the resulting blurred texture is added to the scene instead of mixed with it, as light is additive. Also, an intensity factor is provided to play with the effect.
God Rays
- Coming soon.