If you are building a physics based game/application and you have plans of it running in a wide range of computers, you need to fix your physics timestep.
Index
Understanding the problem
Your game may be running fine at 120 fps in your computer, but lower-end computers out there waiting for your game to come out may not be able to even reach 60 fps. Having the physics tied up to the application delta time causes the following behaviour when you apply the same torque to an object at 120 and 30 fps.
Torque applied at 120 fps (note that the gif is clamped at 33 fps):
Torque applied at 30 fps (literally unplayable!):
Fixed physics time steps allow the application physics simulation system to run always at the same speed independently from the current framerate. Unreal Engine 4 allows you to fix your physics timestep with Substepping. Using this technique, the previous example will now behave like this:
Torque applied at 10 fps (substepping enabled):
Tip: you can use commands ~ Stat FPS to display the current fps counter, and ~ t.MaxFPS 30 to lock the application fps to 30 for this test (remember using t.MaxFPS -1 to reset).
A fixed physics timestep will allow every user of your application to use it at the same speed regardless of their framerate.
Solving the problem
Substepping is a technique that allows the engine to subdivide the Tick() into multiple sub-ticks in order to reproduce more physics ticks to reach the desired physics delta time. Good news is UE4 does this internally, and it is completely hidden to the user. However, if you are going to implement this, you will have to work a little differently with physics.
Configuring substepping
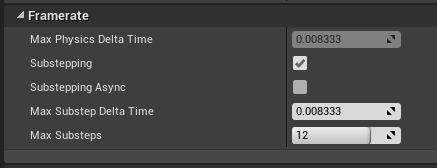
You can enable substepping by ticking Project Settings > Physics > Framerate > Substepping. There are a couple configuration settings to take into account here.
Max Substep Delta Time
This delta defines the step time above which the physics engine will need to perform substeps. It will perform as many substeps as needed to reach 1 / max-substep-delta-time (1 / 0.008333 = 120fps in this case). The following tables show some practical examples for a better understanding (bear in mind, this is the most important setting when it comes to defining the update loop):
FPS: The frames per second at which the app is moving.
Substeps per Tick(): The amount of substeps that were performed on a render frame.
Substep time: The time in milliseconds that took the each substep.
Total: The total time (Substeps per Tick() * Substep time).
Max Substep Delta = 1 / 120 (= 0.008333):
| FPS | Substeps per Tick() | Substep time | Total |
|---|---|---|---|
| 120 | 2 | 0.004167 | (1 / 120) 0.008333 |
| 60 | 3 | 0.005556 | (1 / 60) 0.016668 |
| 30 | 5 | 0.006667 | (1 / 30) 0.033335 |
| 15 | 9 | 0.007407 | (1 / 15) 0.066667 |
Max Substep Delta = 1 / 60 (= 0.016667):
| FPS | Substeps per Tick() | Substep time | Total |
|---|---|---|---|
| 120 | 1 | 0.008333 | (1 / 120) 0.008333 |
| 80 | 1 | 0.001250 | (1 / 80) 0.016668 |
| 60 | 2 | 0.008333 | (1 / 60) 0.016668 |
| 30 | 2 | 0.016668 | (1 / 30) 0.033335 |
Max Substep Delta = 1 / 30 (= 0.033333):
| FPS | Substeps per Tick() | Substep time | Total |
|---|---|---|---|
| 120 | 1 | 0.008333 | (1 / 120) 0.008333 |
| 60 | 1 | 0.016668 | (1 / 60) 0.016668 |
| 30 | 2 | 0.016668 | (1 / 30) 0.033335 |
| 10 | 4 | 0.025001 | (1 / 10) 0.010004 |
Note: this numbers have been tested using command ~ t.MaxFPS, so assume that instead of 120 fps, this results are for 119.99 fps, 59.99 fps instead of 60 fps, and so on.
The results of the observation show how (1 / max-substep-delta-time) defines the max framerate at which our game should run. Any lower framerates than the desired one will slow down the rendering, but not the physics, while higher framerates than the one defined by max substep delta time will result in an overall speed up to our game.
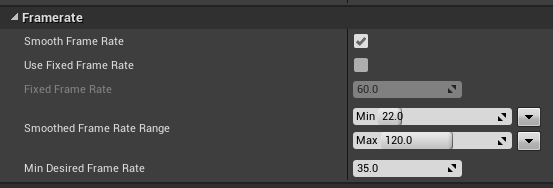
In order to fix the time step to the physics desired rate, you should not use a Fixed Framerate. Instead, you should define the Smoothed Frame Rate Range, and set the max frame rate to the desired value. In the case of Fuel Renegades, we needed the physics to run at 120 fps (0.008333) in order for them to be as deterministic as possible, so we set the framerate settings like this:
Max Substeps
Max substeps define the maximum subdivisions that the physics engine will be able to make to catch up with lower framerates. This makes sure that if the framerate drops too low (because of rendering) the CPU will not be overloaded by having too run too many physics steps. However, on those very low framerates physics will slow down.
So you need to set the max substeps to the minimum framerate at which your game is considered playable or enjoyable. Be careful not to overextend this value, because it would cause a CPU slowdown!
Setting up substepping in code
Coding time it is! In your C++ classes, physics calculations can no longer be performed in the Tick() as they used to do.
Lets see an easy example of the template we will need to implement on your AActor classes using physics. In the header we need to have the following lines of code. We will want to define a PhysicsTick() function as a BlueprintNativeEvent, so that it can be summoned from Blueprints if needed.
 public:
  // Event called every physics tick and sub-step.
  UFUNCTION(BlueprintNativeEvent)
  void PhysicsTick(float SubstepDeltaTime);
  virtual void PhysicsTick_Implementation(float SubstepDeltaTime);

  // Custom physics Delegate
  FCalculateCustomPhysics OnCalculateCustomPhysics;
  void CustomPhysics(float DeltaTime, FBodyInstance* BodyInstance);
Also, we will need to subscribe to the FCalculateCustomPhysics Delegate. You can call it like this inside of the class constructor. Note that we will need to replace AExampleActor for the name of you AActor class!
OnCalculateCustomPhysics.BindUObject(this, &AExampleActor::CustomPhysics);
In the actor's Tick() function, we need to actually add the custom physics each frame to the RootComponent body instance. In my case, box_component_ is the RootComponent's Body Instance of the actor.
  // Add custom physics on RootComponent's BodyInstance
  if (box_component_->GetBodyInstance() != NULL)
  {
    box_component_->GetBodyInstance()->AddCustomPhysics(OnCalculateCustomPhysics);
  }
Finally, we can declare our PhysicsTick() function (note that it is the _Implementation the one defined!) and call it from our CustomPhysics() function This function will be executed once per substep.
  void AHoverVehicle::PhysicsTick_Implementation(float SubstepDeltaTime)
  {
    // Physics calculations go here...
  }

  void AHoverVehicle::CustomPhysics(float DeltaTime, FBodyInstance* BodyInstance)
  {
    PhysicsTick(DeltaTime);
  }
Note: There is a newer way to handle substepping in UE4 4.15, which i believe it works per scene, rather than for each actor, but I have not tried this yet.
Handling substep physics
With this setup, now we need to call all the physics related stuff inside of the CustomPhysics() function in order for them the be executed the proper amount of times. But in order to do this, we have to keep in mind some things:
We need to work with BodyInstance
From now on, all writing and reading of data needs to be done to the BodyInstance of the object we're applying physics to. The reason for this, is that BodyInstance's data stays always up-to-date on physics steps, while the actual component is only updated once per Tick(). Here are some examples of using body instance's data:
// Getting the transformation matrix of the object
FTransform WorldTransform = box_component_->GetBodyInstance()->GetUnrealWorldTransform_AssumesLocked();

// World Location
FVector Location = WorldTransform.GetLocation();

// Getting the forward, right, and up vectors
FVector Forward = WorldTransform.GetUnitAxis(EAxis::X);
FVector Right   = WorldTransform.GetUnitAxis(EAxis::Z);
FVector Up      = WorldTransform.GetUnitAxis(EAxis::Y);
Forces need to use substepping
Applying forces also needs to be done from the BodyInstance of the component in order for data to be saved.
// Adding forces
box_component_->GetBodyInstance()->AddForce(Forward, false);
box_component_->GetBodyInstance()->AddTorque(Right, false, true);
box_component_->GetBodyInstance()->AddForceAtPosition(-Forward, StartPoint, false);
Note that there is an extra parameter in each of the functions called bAllowSubstepping. Contrary to what it suggests, you must set it to false in order for physics to work correctly.
Note: As you know, you don’t need to multiply physics forces by the Delta Time, as UE4 does that for you.
Why doesn’t UE4 use a fixed timestep?
Unlike Unity3D (using a fixed timestep) Unreal Engine 4 is using a semi-fixed timestep. As the Epic Games developer Ori Cohen says:
We actually had a debate about these two techniques and eventually decided on semi-fixed, and here’s why:
If you use Free the physics you have to use a timebank. If you want to tick physics at 60fps and you have a frame that took a little bit more than 1⁄60 you will need to have some left over time. Then you will tick the physics engine with the perfect 1⁄60 delta time, leaving the remainder for the next frame. The problem is that the rest of the engine still uses the original delta time. This means that things like blueprint will be given a delta time of 1⁄60 + a bit.
You can imagine a case where a user would want to use delta time in blueprint to determine the location of an object that’s moving at some constant speed by saying “new position = old position + speed * delta time” In such a case the user will expect the object to move speed * delta time. However, since delta time is longer the the time we tick a single physics frame, we would need to either brake the movement into two physics ticks to maintain the right speed, or we would have to place the object in the new expected position at the end of the frame, but increase speed. Either way the result isn’t what the user would expect.
Getting the rest of the engine to use this new delta time would affect many systems, and so we ultimately decided to go with semi fixed.
References
So, you managed to achieve physics framerate independence! If you had any problem, do not hesitate to contact me, or try reaching out to the UE4 discord (Unreal Slackers), where 0lento helped me find all this out! The troubles I had when searching information on this matter on the web and the official UE4 docs is what pushed me to do this small write-up about it. However, there are a couple links that helped me understand UE4 timestep and physics better: